Instructions for Large Hand - 3 Ribbons
![]()
Congratulations on your purchase of Pro Bow The Hand. This item truly revolutionizes the construction of bows. Never before has making a bow been so simple with perfect results every time.
We are committed to your satisfaction as a customer. Instructions on how to use the Pro Bow are on our website at www.probowthehand.com To access the instructions, click on the bow gallery button. Next, select large or small hand. Within each gallery are two instructional videos – one using one ribbon and one using 3 ribbons. These videos are about 10 minutes long and show step-by-step instructions on how to use the Pro Bow.
After you have watched the instructional videos and are a master at using The Hand, you are ready to use my “bow recipes.” You will find these recipes in the bow galleries along with a short, accompanying video. The bow recipe videos are filmed much faster and show you how different ribbons and finger placement create beautiful bows. Each time I make something I think you will also enjoy, I post it as a bow recipe! We strive to take the guess work out of bow making and show the wide range of bows that can be made using The Hand. However, you will certainly want to experiment for yourself!
We would love to hear from you and post your wonderful creations on our Facebook page to share with others.
Included in the box please find - 1 large board with rows with holes, this is the Hand, the slim board with 3 holes is the spool holder and one bag of 17 – 3 1/2 inch and 4-6 inch “spindles” these are the large fingers - one bag of 13 – 2 ½ inch spindles or small fingers. One set of 8 non-skid pads. Please stick one on the back of the hand and spool holder on each corner, this insures a firm work platform.
Figure 1
Lets look at the face of the Hand, Figure 2. Notice the lines connecting the holes. This is so you can visually follow the row you are working on. Notice the “C”. This is the center loop of the bow. The hole nearest the nail is the base finger, or the center of the bottom of the bow. You will always have a finger in this position when make basic bows. Next notice the 1R-1L, 2R-2L, etc. After the center loop work outward to 1 Right then 1 Left. Now both sides of your bow are perfect. If you want a fuller bow move to 2 Right then 2 Left. This row of loops are ½” bigger than 1R-1L. Want a fuller bow – move on to 3 R-3L, etc.
Now notice A-B-C-D-E. A set of 13 fingers has been included for 1” Ribbon and smaller to be used on Row A. The size of the bow is determined by which row you work on. Small Bow – Row A, then each letter B-C-D-E the bow becomes bigger.
The fullness of the bow or how many loops the bow has is determined by how many times you go around each finger - C, 1R-1L, 2R-2L, etc. The style of the bow is determined by mixing the use of fingers on different rows, an example of this will follow.
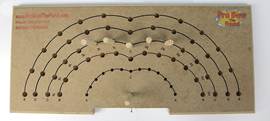
Figure 2
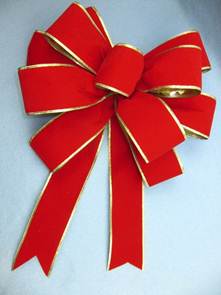
The bow pictured in Figure 3 is a basic 3-ribbon bow using 1 yard – 24 inches of each ribbon. The ribbon is 2 ½ inches wide or #40 ribbon. This is a very nice large package bow! You will also need 1 piece of 26-gauge wire cut to about 18 inches.

Figure 3
Step 1
Sit the hand on your work surface with the spool holder sitting on the Right Always even if you are left-handed. It is a right to left hand movement. You will be using both hands equally! Next, place the fingers in position, the flat end goes in the holes, the tapered end of the finger goes up. The ends of the fingers are tapered so the ribbon easily glides over them. Place fingers as shown in Figure 4. Base finger, then center finger on Row C – Finger 1R-1L – Finger 2R-2L, also on Row C.
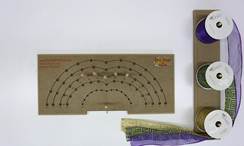
Figure 4
Step 2
Place ribbon on spool holder reeling off to the right. Pull all ribbon downward stacked on top of each other very neatly. Figure 5
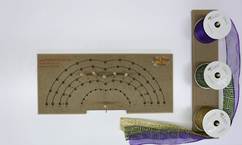
Figure 5
Step 3
Pinch Ribbon ½ inch from the end. Hold in left hand. Keep your hand close to the table. If you raise your hand up in the air the ribbon will pop off the spools and too much ribbon will reel off and get tangled. You don’t want that to happen. Figure 6
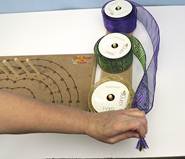
Figure 6
Step 4
Hold 18-inch piece of wire in Right Hand and approach left hand and the pinch from the back. Slip the wire between pinch and finger. Leave 9 inches up – 9 inches down. Figure 7 & 8
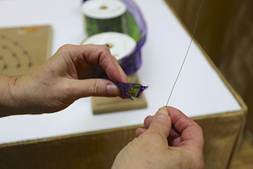
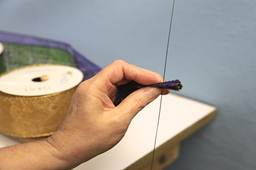
Figure 7 & 8
Step 5
Now hold top of wire with Right Hand and swing toward you. Go around the pinch very tightly and neatly, about 2 times. Figure 9
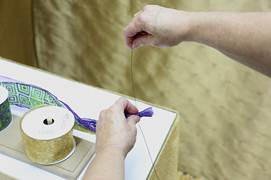
Figure 9
Step 6
This is how it should look. Figure 10
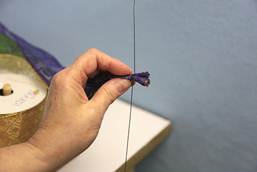
Figure 10
Step 7
Now pull ribbon toward Hand. Notice how low I am keeping the ribbon to the table. This will keep ribbon from popping off of the spools and tangling. Figure 11

Figure 11
Step 8
Notice how I have gone around center finger from the left and then pulled the ribbon downward to base finger. Notice I have kept 1 piece of wire up and one wire down. Pinch the wired ribbon on the “pinch” to the base finger. Do Not push the pinch all the way down to the hand. Go up the base finger to half the width of the ribbon you are using. I am using 2-½ inch ribbon so I am up the baser finger 1-¼ inches. Continue holding pinch in place with Right Hand. With Left Hand pull wire up base finger then wrap around top of finger. To start wrap go left and go around back of base finger then continue wrapping. Leave just a tiny tip sticking out so you can get to the wire at the end of bow making. Now holding pinch in place with Left Hand, pull the downward wire with Right Hand and go around nail just once and stick all of the wire under the board, leaving a small loop so you can also get to this piece of wire at the end. This is how your work should look at this point. The ribbon firmly wired in place to the hand. Figure 12, 13 & 14

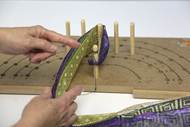
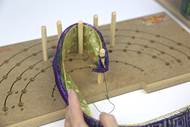
Figure 12, 13 & 14
Step 9
Pull ribbon down snugly. Now I will be referring to the bottom edge of the ribbon. Notice in Figure 15. Notice my Right Hand position in the picture, Figure 16
The back of my finger is touching the base Finger under the pinch. The Bottom Edge of the ribbon is touching the palm of my Right Hand. My thumb is touching the top edge of the ribbon. My Left Hand fingers are pushing down to my Right Hand finger. I am rotating my Right Hand bringing the bottom edge of the ribbon up; this is forming a twist in the ribbon over the wired pinch.
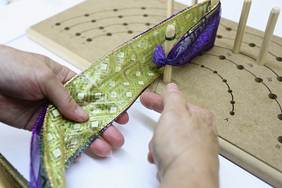
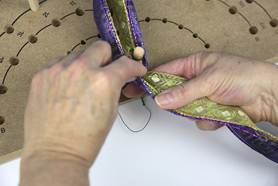
Figure 15 & Figure 16
Step 10
Now glide the ribbon with finger toward Finger 1 Right. Figure 17
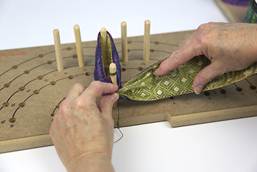
Figure 17
Step 11
Flip Ribbon over Finger 1 Right and pull down snugly. Figure 18
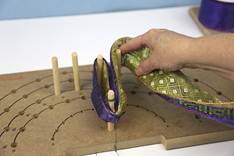
Figure 18
Step 12
Notice the ½ twist that is forming in the hand to spool ribbon. That always forms on the Right. If you twist from the bottom edge of the ribbon – bring the bottom edge up each time; the hand to spool ribbon will never get twisted. This is so important. It saves so much time and no spools of ribbon rolling all over the floor. Figure 19

Figure 19
Step 13
Now notice my Left Hand position. I will do the exact movement I just did to the Right – except I will move to the left toward Finger 1 left. The back of my Left Finger is touching the base finger under the wired pinch. Now my Right Hand is pushing the ribbon down to my Left Hand. The bottom edge of the ribbon is touching my Left Hand finger. My thumb is touching the top of the ribbon. Figure 20
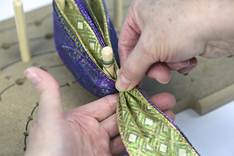
Figure 20
Step 14
Now I have closed my Left Hand and have twisted the ribbon bringing the bottom edge up. Figure 21
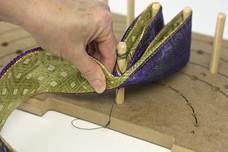
Figure 21
Step 15
Glide off of Left Hand fingers toward Finger 1 Left. Figure 22
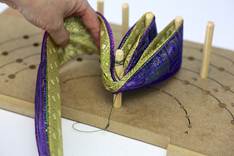
Figure 22
Step 16
Slip over Finger 1 Left and pull down snugly. Figure 23
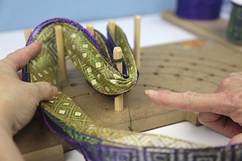
Figure 23
Step 17
Notice that the ribbon from the Hand to spools is straight – no twist. If you do the Right to Left Hand movement each time and bring the bottom edge of the ribbon up when twisting at Base Finger your hand to spool ribbon will never get twisted. You won’t have spools of ribbon rolling all over the floor when using the spool holder properly! Figure 24
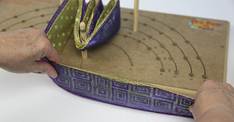
Figure 24
Step 18
Now twist at Base Finger – go toward Finger 2 Right. Pull down snugly. Figure 25
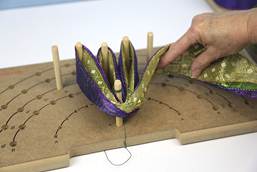
Figure 25
Step 19
Now twist at Base Finger and go toward Finger 2 Left. Pull down snugly. Notice because you twisted from the bottom edge of ribbon each time, bring the bottom edge up – the hand to spool ribbon stays straight! Figure 26
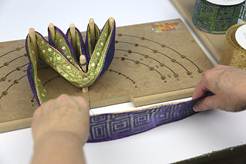
Figure 26
Step 20
Now twist at Base Finger to finish – again bring bottom edge of ribbon up. Hold with left hand. With Right Hand grab that little piece of wire you left sticking out around top of Base Finger and pull straight up in the air gently unwinding as you go. Now pull toward yourself firmly. Figure 27
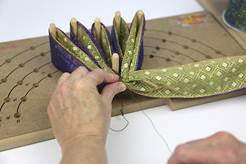
Figure 27
Step 21
With Left Hand grab the loop of wire by the nail – unwind from nail and pull up firmly. Twist the two pieces of wire together as tightly as you can. Figure 28
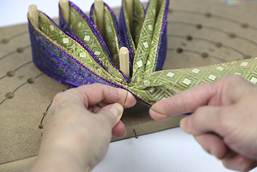
Figure 28
Step 22
Now gently lift ribbon from Hand. Figure 29

Figure 29
Step 23
Tie 1 piece of ribbon around package; make a firm knot in the middle. Cut tails as long as you like. Cut a nice V in each end. Then slip 1 piece of wire under the knot – the other over the knot and pull tightly together and twist wires together. Cut off excess wire. Figure 30

Figure 30
Step 24
Fluff bow – pull all loops apart - always put your fingers through the loops to pull – don’t pull from the edge – ribbon will tear! Fluff until you get your loops to your liking and enjoy. Figure 31 & 32


Figure 31 & Figure 32
This is an example of a different Style bow. Place center Finger on row B. Then the other Fingers on row C – 1 wrap each. This will give a much smaller center loop creating a very different Style of bow. Enjoy!
Bow Recipe
Large Hand
5 Yard Bow
Row B
Center Finger - 1 Wrap
Row C
Finger 2 Right & Left - 1 Wrap
Finger 3 Right & Left - 1 Wrap
Finger 4 Right & Left - 1 Wrap
Finger 5 Right & Left - 1 Wrap
Finger 6 Right & Left - 1 Wrap
![]()